How to use the Tutor.com classroom
Step One: Sign On
To get started, login to Canvas and access one of your courses. In the left menu, click on ‘Online Tutoring’.
Step Two: Choose Your Subject
Simply click on a topic and select the course you need help with. For example, if you need help with an algebra problem, select “Math” and then your specific course.
Step Three: Enter Your Question or Assignment
In the pre-session questionnaire, you’ll answer a few quick questions so we can connect you with the tutor best suited for your level and needs. To maximize your session time, we suggest preparing in advance— have a question ready to go! Your tutor can review a concept from class, go over homework problems, or help with your writing assignment.
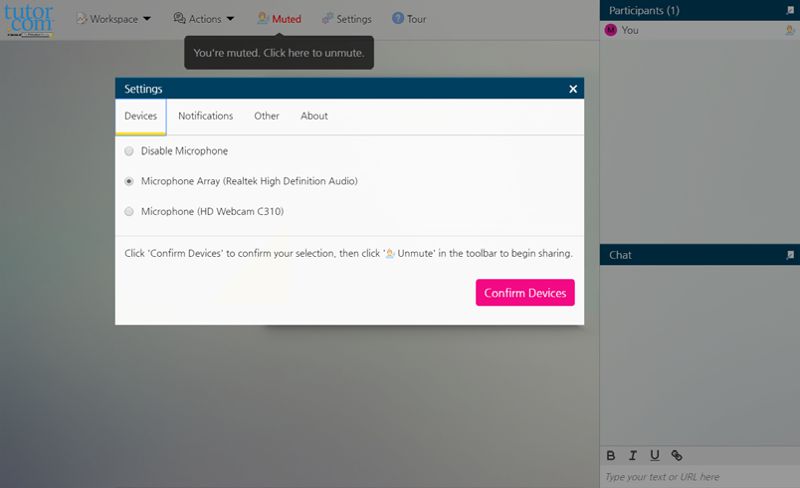
Step Four: Connect with Voice Chat
At the beginning of each session you will be automatically prompted to choose your audio device. Your device’s internal microphone is selected by default, but you can change which device you want to use or even disable your microphone in favor of text chat. All audio from a voice chat is recorded and can be played back after a session.
Step Five: Work with a Tutor
When you enter the classroom, you’ll see a chat window at the far right next to your digital workspace. Use text chat with your tutor if you prefer not to use voice. You may also choose the type of workspace you want to use from the top navigation menu. Choices include a whiteboard, text editor, code editor, graphing calculator, and screen sharing. Ask your tutor for a quick tour!
Step Six: Screen Share Your Assignment
Select Screen Sharing from the Workspaces menu to share your screen or an application window with your tutor. This is helpful for collaborating in real time on things such as Google Docs or viewing online assignments or resources together.
Step Seven: Submit a Paper for Review
Short on time? Drop your paper off for a tutor to review and leave feedback. Simply click on the Submit an Essay tab on your account sidebar, fill out a few questions, and send your essay in. We will return it to you with a completed feed- back form—check your Previous Sessions page under My Account within 24 hours.
Step Eight: Access Personalized Features
Your Tutor.com account is your own personalized learning environment. Save your favorite tutors, retrieve archived sessions and essay reviews, and store documents in a digital file locker. You can access these features any time—this will not count against your allotted tutoring time.
Step Nine: Share Feedback & Save a Session
Your feedback is very important. After each session, please fill out the post-session survey and provide feedback about your experience. We’d like to know how the tutor helped, what you think of the online classroom, and anything else you’d like to tell us. You can also save, replay, email, and print a transcript of your session.


